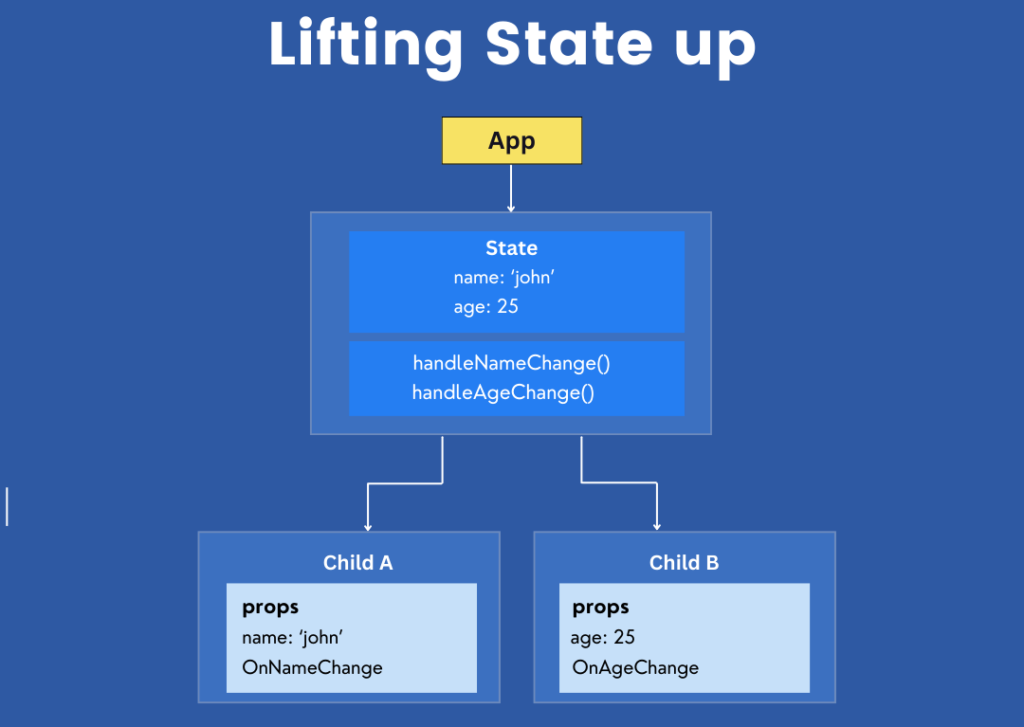
Lifting State Up
Lifting state up is a concept in React that involves moving state to a common ancestor component so that multiple components can share and manage the same state. This approach is essential when you have sibling components that need to communicate or share data.

Understanding State Sharing Between Components
In a typical React application, you might encounter situations where multiple components need to access or modify the same piece of state. For example, if you have a form with multiple input fields that need to interact with each other, managing their state separately can become complex and error-prone.
Lifting State Up to a Common Ancestor
To solve this problem, you lift the state up to the nearest common ancestor of the components that need to share the state. The common ancestor component then manages the state and passes it down to its child components as props. This way, all the state-related logic is centralized, making the code easier to maintain and debug.
Steps to Lift State Up:
- Identify the common ancestor of the components that need to share the state.
- Move the state and any related functions to the common ancestor.
- Pass the state and functions down to the child components via props.
- Use the passed props in the child components to read and update the state.
Example: Temperature Calculator
Let’s implement a temperature calculator that converts between Celsius and Fahrenheit. We’ll have two input fields: one for Celsius and one for Fahrenheit. When you enter a value in one field, the other field updates automatically.
Step 1: Create the TemperatureInput Component
First, create a TemperatureInput component for the input fields.
import React from 'react';

function TemperatureInput(props) {
  const handleChange = (event) => {
    props.onTemperatureChange(event.target.value);
  };

  return (
    <fieldset>
      <legend>Enter temperature in {props.scale}:</legend>
      <input value={props.temperature} onChange={handleChange} />
    </fieldset>
  );
}

export default TemperatureInput;Step 2: Create the Calculator Component
Next, create a Calculator component that will manage the state and handle the conversions.
import React, { useState } from 'react';
import TemperatureInput from './TemperatureInput';

function toCelsius(fahrenheit) {
  return ((fahrenheit - 32) * 5) / 9;
}

function toFahrenheit(celsius) {
  return (celsius * 9) / 5 + 32;
}

function tryConvert(temperature, convert) {
  const input = parseFloat(temperature);
  if (Number.isNaN(input)) {
    return '';
  }
  const output = convert(input);
  const rounded = Math.round(output * 1000) / 1000;
  return rounded.toString();
}

function Calculator() {
  const [temperature, setTemperature] = useState('');
  const [scale, setScale] = useState('c');

  const handleCelsiusChange = (temperature) => {
    setTemperature(temperature);
    setScale('c');
  };

  const handleFahrenheitChange = (temperature) => {
    setTemperature(temperature);
    setScale('f');
  };

  const celsius = scale === 'f' ? tryConvert(temperature, toCelsius) : temperature;
  const fahrenheit = scale === 'c' ? tryConvert(temperature, toFahrenheit) : temperature;

  return (
    <div>
      <TemperatureInput
        scale="Celsius"
        temperature={celsius}
        onTemperatureChange={handleCelsiusChange}
      />
      <TemperatureInput
        scale="Fahrenheit"
        temperature={fahrenheit}
        onTemperatureChange={handleFahrenheitChange}
      />
    </div>
  );
}

export default Calculator;Explanation:
TemperatureInput Component:
- This component renders an input field for temperature and calls the
onTemperatureChangefunction passed as a prop whenever the input value changes.
- This component renders an input field for temperature and calls the
Calculator Component:
- Manages the state for the temperature and the scale (Celsius or Fahrenheit).
- Contains helper functions to convert between Celsius and Fahrenheit.
- Handles the logic for updating the state when the temperature changes.
- Renders two
TemperatureInputcomponents, passing the necessary props to each.
Step 3: Using the Calculator Component
Finally, render the Calculator component in your application.
import React from 'react';
import ReactDOM from 'react-dom';
import Calculator from './Calculator';

ReactDOM.render(<Calculator />, document.getElementById('root'));Conclusion
Lifting state up is a powerful technique in React that allows you to manage shared state between multiple components effectively. By moving the state to a common ancestor and passing it down as props, you can ensure that your components are always in sync and maintainable. The temperature calculator example demonstrates how to implement this technique to create a simple but functional application.
Next, we’ll explore more advanced topics such as React Router for navigation, Context API for managing global state, and Hooks for enhancing function components.